I have a AllStar node that is built on the HAMVoIP 1.7-01 distribution. HAMVoIP does include SuperMon (see my install article here) but it does not include Supermon2. This document will guide you though the steps to get it installed and setup.
The latest version (as of this article) of Supermon2 is version 2.0. There is a lot of confusion between Supermon and Supermon2 and the version numbers. Supermon and Supermon2 are two separate programs and each have their own version numbers. Supermon is up to version 7.1 and Supermon2 is at version 2.0. What one is the latest? What one should I install? Well, you can install both if you want. This article will install Supermon2 but will not disable Supermon… you will have both and can use both.
Things you will need to know ahead of time.
- The IP Address of your node
- Your node number
Installing Supermon2
Login to your node (either via the console or SSH). When you login, select 9 from the Admin menu to Start a Bash shell. Then you can change to the root users directory (/root).
cd /rootRun the following commands to pull down the installer and give it the right permissions to run. Note that this is not a real tar file you are pulling down, it is the installer program to run.
wget https://crompton.com/hamradio/supermon2/supermon2-V2.0.tar
chmod 750 supermon2-V2.0.tar
./supermon2-V2.0.tar
Once you run the last line above, the installer will start. It will ask you if you wish to update Supermon2. Even if this is the first time install, answer Y.

This will install all the files.
Adding a Management password to your node:
NOTE: If you have already setup another management interface (like Supermon or Allmon2), then you may already have a manager password setup. If that is the case, you can skip down to the section on Update the Supermon config section.
Login to your node (either via the console or SSH). When you login, select 9 from the Admin menu to Start a Bash shell. Then you can change to the Asterisk config directory.
cd /etc/asteriskEdit the manager.conf file
nano manager.confMake up a secure password and add it in on the line that starts with secret= under the [admin] section (close to the bottom of the file). For example:
secret = <PASSWORD>Enter your desired password in place of the <PASSWORD>
Save the file and restart asterisk (using the astres.sh script).
astres.shUpdate the Supermon2 config:
Change into the Supermon2 directory user directory.
cd /srv/http/supermon2/user_filesEdit the allmon.ini file.
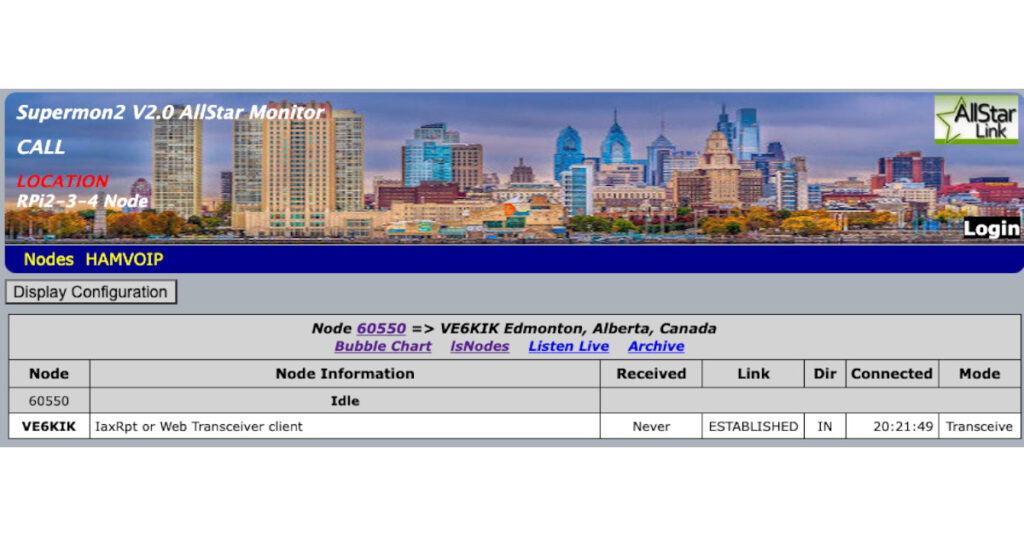
nano allmon.iniChange the section heading [1998] and replace the 1998 with your node number. 1998 is a private node number used for testing, you will want to make sure this is your node number. My node number is 60550 so I will change the section heading to [60550].
below the [60550] heading, you will find a line that starts with passwd=. Change this you include your password. This is the management password you added in the section above.
passwd=<PASSWORD>Make sure to use the management password you added in the section above.
The other node [1999] can just be left in for now. It is another local test node but will not affect anything.
Setting up your user password:
Now you will want to protect your Supermon2 web page so that only you (or others that you allow) can access it. This is done by adding in the username and password that is used by the Supermon2 login.
Make sure you are still in the Supermon2 user directory and if not, then change to it.
cd /srv/http/supermon2/user_filesThere is now a script in this directory to create and add the user for you. Run the set_password script:
./set_password.shCreate a new user password. You can also use this script to clear all passwords. This is the username you will use to login to the Supermon2 web page, it doesn’t have to be the same as any other username if you want. The program will prompt you for the password. Enter it as well.
That’s all there is. You can now try to login to your supermon page.
http://<NODE IP>/supermon2Note you should enter your node’s IP address in instead of the <NODE IP>. For example, if my nodes IP was 192.168.10.1 I would type (in my browser):
http://192.168.10.1/supermonEnjoy!