![]() I replaced my closet doors and decided to also place some LED strip lighting in the closets. I look all over for a good controller to turn the LED lights on/off as the closet doors open and close. This seemed like a simple request at first but I soon found that I didn’t like any of the comercial solutions. They all seemed to have issues. The solution would be to build my own. Let’s face it, it’s a lot more fun to build it yourself anyhow.
I replaced my closet doors and decided to also place some LED strip lighting in the closets. I look all over for a good controller to turn the LED lights on/off as the closet doors open and close. This seemed like a simple request at first but I soon found that I didn’t like any of the comercial solutions. They all seemed to have issues. The solution would be to build my own. Let’s face it, it’s a lot more fun to build it yourself anyhow.
Some of the issues with comercial solutions:

A number of the solutions I looked at used pressure switches or magnetic read switches to detect when the doors where open or closed. This solution would work well on a closet that had one door that opened and closed but mine slid side to side. This ment that the doors could switch sides. The inside door might be on the left one day but in the right the next. I might be able to over come this by putting magnetic sensors on each side of the sliding doors but then that would require 4 sensors and that rased the cost.
IKEA had a solution that seemed like it was close to what I needed. The LED strip they have had a built IR distance sensor that can “see” when the door is in front of it. This seemed like the perfect solution so I bought one. I soon found out that it didn’t work well on my sliding doors. The door has to be fairly close to the sensor for it to detect the door. When I installed it I found it was able to detect the inside sliding door but not the outer most door.
Working on my own design:
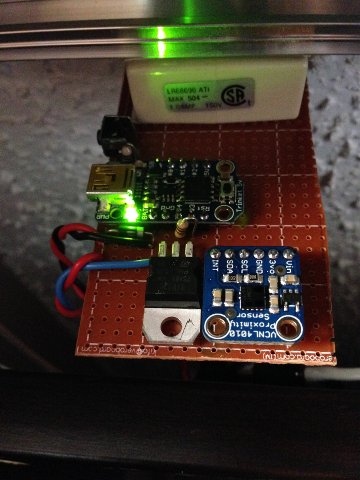
I liked the IKEA design, It was eligant and would work for just about and door type. I chose to also use an IR distance sensor in my design. For my first tests I started with the Sharp GP2Y0D810Z0F sensor. This is a good sensor that does not measure distance. It is a digital sensor that just sends a signal when it detects something in from of it. After some testing I found that this sensor wouldn’t work for me. It was a little flaky at the distance I wanted and affected a lot by ambient light. After some testing I settled on the Adafruit VCNL4010 sensor. This sensor worked like a charm. It is a full IR distance sensor that connects to the i2c buss, it’s not expensive, and is easy to use.
I started this project using an Adafruit Trinket Pro for the controller. This is a great Arduino compatable device and I use it for most of my projects. After experimenting for a while I decided to try the project with the cheaper and smaller Adafruit Tricket. The Trinket I picked up was the 5.0v 16Mhz small Trinket from Adafruit. This device is low cost, smaller, and does not have as much memory as the Pro version. The memory was tight and I had to remove some debuging code but it did finaly all fit and worked well.

Parts List:
- Adafruit 5v Trinket
- VNLC4010 Distance Sensor
- TIP-120 Power NPN Transistor
- 1K Ohm Resistor
- 10K Ohm Resistor
- 1N4007 Diode
- momentary contact push button
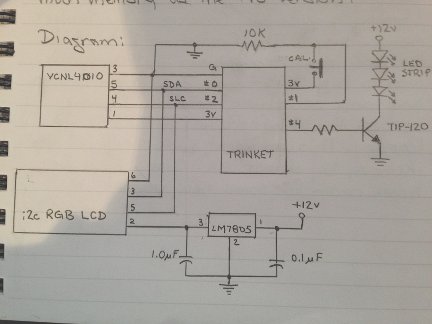
Here is the diagram:
I ran into a couple of issues when using the Trinket. The first is that there is no serial port. With the Trinket Pro I was able to use the serial monitor on the FTDI port for debuging but the Trinket doesn’t have one. Not to worry, I have an old i2c LCD display lying around that I will connect up and use that for displaying my debuging messages. The LCD Display is optionsl and not required for this project unless you are looking to work on the code and need the debuging information. I removed the LCD display from my production system and commented out the code. Here is the schematic diagram with the LCD display in case you are interested.

Adding the LCD display (and the code that goes wth it) caused more issues. Memory Size! The Adafruit RGBShield Library that I was using is quite big (relative to the small Trinket memory size). The first time I tried it on the Trinket, the Arduino IDE complained that the sketch was to big. After some code optimization and some searching around, I came across the Adafruit TinyRGBLCDShield library. This was great and it reduced the memory footprint by almost 2k. Great, now I have room for some new features.
( Stay tuned… more to come… )

